4K: Extra Tid-bits

So how small will 4K Ultra HD screens get?

 In the short term, screen sizes are likely to stabilise at 55-inches and upwards. That’s because as the screen size shrinks the advantage of having such a pixel dense display starts to diminish. There’s also an irrefutable relationship between screen resolution and viewing distances.

While seating will vary from home to home, generally speaking a large 4K TV will provide an upgrade for a smaller 1080p screen. However, the 4K resolution will ultimately be about more than just definition.

High frame rate UHD broadcasting could have an even greater impact than resolution when services begin – and the benefits of HFR are not restricted to larger screen sizes. When this second generation 4K UHD breaks cover, expect high-frame rate 4K TVs to drop further down the size scale.

 How far should I sit from a 4K TV for the best picture?

 4K Ultra HD is a much more intimate viewing experience than Full HD. In many respects, the best way to view 4K is analogous to the way we view films in a cinema. Old style cinemas were shoe-box shaped and most patrons sat typically 3-5 screen heights away, because that was the most comfortable viewing distance.

Contemporary cinemas are wider, and now the optimum viewing distance is 1.5 screen heights back. From this vantage point you can take in all the visual information that’s available and comfortably fill your field of vision. Translated to the home, that makes the most comfortable distance to view a 65-inch 4K screen approx. 1.5m. Of course, in many homes that simply isn’t practical. Consequently, a large 4K screen is probably best viewed at a distance of between 2-3m; time to rearrange your furniture?

 Is 4K OLED even better?

 OLED – organic light emitting diodes – have been around for some time, but producing big screens using this technology has proven to be prohibitively expensive in the past, something which has blighted the chances of OLED televisions becoming mainstream.

That said, LG is doing its best to change this, with the Korean company leading the charge for OLED televisions – which is great, because OLED technology is stunning, with vibrant colours, deep blacks and bright whites.

And that perseverance has paid off with LG launching its first 4K OLED television this year. It’s still expensive, but as Mr K I Kwon, president of LG Electronics UK, told TechRadar recently, “I believe the price and yield rate will be higher immediately and the price will be down.”

So, although LG’s 4K OLED television is probably too expensive for mass market right now, we shouldn’t rule out OLED as a big player in the next generation of our televisions just yet.

 What kind of cables will I need for 4K?

 The two standard cables you’re most likely to use are either a standard HDMI or if you’re connecting a PC to a Ultra HD monitor, DisplayPort.

HDMI cables now come in four flavors: high speed with ethernet; high speed without ethernet; standard speed with ethernet and standard speed without ethernet. Standard speed cables are capable of 1080i, but aren’t able to handle the bandwidth of 4K. High speed cables can do anything higher than 1080. Now, as long as you’re using the same class of cable, there is no distinguishable difference in terms of performance between one manufacturer’s set of cables and another’s.

The speed of your connection will depend on the types of connectors, which includes HDMI 1.4, HDMI 2.0 and HDMI 2.0a. HDMI 1.4 connectors support a 3820×2160-resolution at 30 frames per second, while HDMI 2.0 is the latest spec and can output video at Ultra HD resolution at 60 frames per second. (But more on that below!) HDMI 2.0a is capable of HDR, which is limited to a very specific range of televisions from each manufacturer.

The other type of cable you can use is DisplayPort. DisplayPort carries 4K image and audio signal from most high-end graphics cards to monitors without any noticeable artifacts or delays.

How important is HDMI 2.0 to 4K Ultra HD?

 HDMI 2.0 is the latest iteration of the HDMI specification. While the existing HDMI 1.4 standard can deliver 4K video, it’s limited to 30 frames per second (or 30Hz). While this is fine for most movies, broadcasters are looking for higher frame rates for TV.

HDMI 2.0 increases bandwidth up to 18Gbps and supports 4K Ultra HD at 50/60 fps, with 12-bit 4:2:2 colour (you don’t need any special cables for HDMI 2.0 interconnectivity, any current high-speed cable will work). However, only Panasonic currently offers an HDMI 2.0 compatible 4K TV, in the shape of the TX-L65WT600.

So where does that leave the remaining first generation 4K sets? Well both Philips and Samsung, whose 4K panels are coupled to separate connection boxes, say they’ll simply introduce new tuners which owners can upgrade to.

Sony and others are looking to implement a firmware fix; by shedding colour sub pixels they reckon they’ll be able to fit high frame-rate 4K down a HDMI 1.4 pipe, most likely with 8 bit 4:2:0 colour. How visible this kludge will be remains to be seen. For what it’s worth, we’ve seen JVC’s 4K e-Shift3 projectors running 4K at the same colour resolution, and they look spectacular so the omens are good.
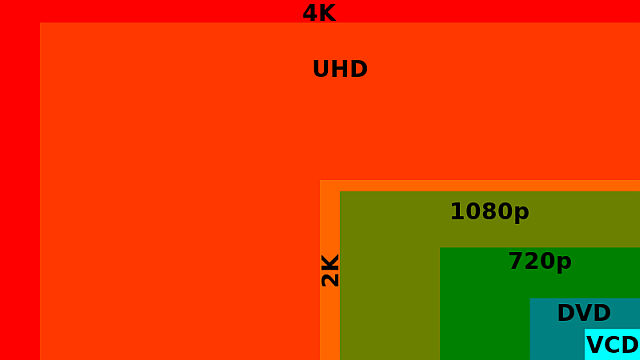
4K and UHD

 And what about this HDR stuff then?

HDR, UHD, OLED … there’s no shortage of acronyms in home entertainment.

HDR, or high dynamic range, is a concept borrowed from digital imaging which combines three images – one with normal lighting, one with underexposure and one with overexposure – to give more contrast to an image or video.

Amazon was the first content provider to release HDR video in 2015, and even now it is still the only streaming company to offer the service. That said, Netflix will use the same technology to deliver its own HDR content this year.

There’s an extra 20% increase in the necessary bandwidth for both HDR and 4K, but Netflix has said if there’s not enough for both it will prioritise the HDR stream as that’s the most impactful in terms of image quality.

Quantum Dot sounds like theoretical physics

It does indeed. But unlike some problems in theoretical physics, the solution is already here. Quantum Dot displays (QD for short) are simply LED panels with a thin film of nano-crystals in between the backlight and the display. Manufacturers like LG and Sony claim that this increases color depth by around 30% without adding extra pixels or implementing a wacky algorithm to digitally manipulate the display.

We went hands on with a few QD panels at CES 2015, including the LG UF9400 Quantum Dot 4K UHD TV and Samsung SUHD Curved TV, which uses a variation of Quantum Dot. We liked what we saw, mostly, and especially on the Samsung SUHD. The LG had some issues with oversaturation … but that may be fixed by the time the TV comes to market in Q2 2015.

 Hang on, what about 8K?

 If 4K offers four times the resolution of Full HD, then 8K will deliver 16 times the definition. 8K screens comprise a staggering 33 million pixels.

This is an order of magnitude beyond any display technology currently available, and only one broadcaster, Japanese state owned NHK, has publically said it intends to commercialise the technology.

Also known as Super Hi-Vision, a number of 8K trials have been conducted, including acquisition at the London 2012 Olympics. NHK has since pledged to shoot and transmit the 2020 Tokyo Olympics in the format.

Of course, bringing 8K to market is a formidable technical challenge. As with 4K, HEVC, is currently favoured as the best compression technology for the job.

However, because the benefits of 8K image definition only really become apparent on screens 84-inches and larger, the format is not seen as a commercially viable platform by most broadcasters and TV manufacturers. If you’re waiting to jump from Full HD to 8K, you could be kicking your heels for quite some time.

Sharp has released a frighteningly expensive 8K TV exclusively in Japan and LG was showing off the world’s first HDR-ready 8K TV at CES 2016.


Ultra HD Premium

Ultra HD Premium

 If you’re sitting there thinking that all these new technologies and acronyms sound confusing then you’d be right. That’s why a group of companies decided to form the UHD Alliance with the expressed aim of defining what technologies should be included in the next generation of TV sets.

The UHD Alliance is comprised of 35 companies including television manufacturers such as LG, Panasonic, Samsung, Toshiba, Sony, Sharp, audio companies such as Dolby, and film and television production companies such as Netflix and 20th Century Fox.

The idea then is that if everyone can agree on what features they think UHD should include then Disney (an example member of the alliance) can produce a movie that Netflix will be able to stream through a Samsung TV, and the eventual image will be exactly what the director at Disney intended.

The result of this alliance was the UHD Premium specification announced at CES 2016. The specification comprises a list of features that should be included in products like TVs and Blu-ray players to ensure maximum compatibility with other content and hardware produced.

Currently, in order to adhere to the UHD Premium specification in 2016 a product must firstly have a resolution of at least 3840×2160. It must be capable of displaying a 10-bit colour depth, allowing for 1,024 shades of each of the three primary colours red, green and blue, as opposed to the 256 allowed by the current 8-bit standard.

A TV must also be capable of displaying pixels at a certain brightness and darkness for HDR purposes (technically this light level is from 0.05 to 1,000 ‘nits’ for LEDs and 0.0005 to 540 ‘nits’ for OLED sets for all you number lovers out there). Adhering to these standards means blacks should look truly dark as opposed to just milky black and whites should really pop.

Finally there are a couple of other more technical requirements such as BT.2020 color representation and a horrendously convoluted high dynamic range rating of SMPTE ST2084 EOTF.

Now that this standard has been defined it should just be a case of checking that your next purchase has the ‘Ultra HD Premium’ logo and not having to worry about your set being incompatible with the slew of 4K content that’s about to emerge over the next few years.

Except of course it’s not that simple.

Samsung and Panasonic are embracing the new standard, with both of their flagship lineups wearing their UHD Premium badges with pride. Sony however have decided to go down a more confusing route and have decided to stick with their internal ‘4K HDR’ label despite their sets all actually meeting the required specification. Philips won’t be using the alliance’s badge, but its sets don’t currently meet the specification anyway.

It’s only natural that while a technology is still emerging these problems will continue to exist, but we hope that soon we’ll be able to recommend looking for a UHD Premium set without reservation. Until the whole industry unambiguously backs the standard however, we’d still recommend you tread carefully to ensure maximum compatibility.

 How expensive is an Ultra HD TV?

 The first wave of 4K TVs were large, really large. Both Sony and LG launched with 84-inch panels, the KD-84X9005 and 84LM960V respectively.

Consequently, they were saddled with price tags in excess of £20,000/$30,000. Not to be outdone, Samsung weighed in with the 85-inch S9 at £35,000/$55,000, clearly aimed at footballers and oligarchs!

However, prices have fallen dramatically as screen sizes have shrunk and brands have predictably embarked on a tit for tat price war. You’ll now find 4K TVs for less than £1000, though we’d encourage you to be careful when choosing one – a 4K resolution won’t necessarily give you a better picture if the processing electronics behind the panel are bad.

Generally speaking, a market-leading 65-inch 4K TV like the Sony KD-65X9005B will set you back a little over $3,500/£3,000. But, choosing last year’s model instead of this year’s is one way of saving a bit of money while still getting a premium picture.

For more information visit http://duotechelectronics.co.uk/


Difference between Ultra HD and 4K

should-you-buy-a-4k-resolution-chart

 Technically, “Ultra High Definition” is actually a derivation of the 4K digital cinema standard. However while your local multiplex shows images in native 4096 x 2160 4K resolution, the new Ultra HD consumer format has a slightly lower resolution of 3840 X 2160.

This is one reason why some brands prefer not to use the 4K label at all, sticking with Ultra HD or UHD instead. However, the numerical shorthand looks likely to stick. As a broad brush label it’s so much snappier!

 Why should I care about 4K Ultra HD?

 There are many reasons why 4K should make you rethink your next TV purchase (actually, there are eleven and you can read about them here), not all of them immediately obvious.

Photographers who routinely view their work on an HD TV are seeing but a fraction of the detail inherent in their pictures when they view them at 2160p.

A 4K display reveals so much more nuance and detail – the difference can be astonishing. While 3D has proved to be a faddish diversion, 4K comes without caveats. Its higher resolution images are simply better.

The higher pixel density of a 4K panel also enable you get much closer without the grid-like structure of the image itself becoming visible –this means you can comfortably watch a much larger screen from the same seating position as your current Full HD panel. Currently all available 4K Ultra HD TVs are in excess of 50-inches.

For more information visit http://duotechelectronics.co.uk/


4K TV and UHD: Everything you need to know about Ultra HD

4K Ultra-High Definition will define the future of television – a future that we take one step closer towards every day.

While the name is, in itself, a trifle confusing, 4K (or Ultra HD, or was that UHD?) will become as ubiquitous as HD in the next two or three years.

At its most basic, 4K describes the resolution of your TV set (or the amount of pixels used to make up an image), but it is also increasingly being used to describe a combination of a whole host of new features which together are ushering in a new era in image quality.

There’s always a bit of scepticism about new TV tech (remember how big we thought 3D was going to be and then no one bought on) 4K truly is the next evolution in the way you’ll binge-watch TV. At the moment the only drawback to the technology is the cost of the sets – with many of the best series from LG, Samsung and Sony costing well over £2,000. That said, prices are high now, but these will only get cheaper as the standard is more widely adopted.

At the end of the day it might not be the raw resolution of 4K that tempts you into your next TV purchase, but the inclusion of other cool technologies like High-Dynamic Range, Quantum Dot and OLED panels.

What is 4K?

 The headline fact is simple and dramatic: 4K Ultra HD TVs (also known as UHD TVs) deliver four times as much detail as 1080p Full HD, that’s eight million pixels compared to two million pixels.

What that means in terms of potential image clarity is more fine detail, greater texture and an almost photographic emulsion of smoothness.

But this is just for starters. Prior to a roll-out of TV services, broadcasters are working out what else they can upgrade under the 4K banner. In the UK, a working group chaired by the BBC and BSkyB are mulling over every possible tweak, from higher frame rates to greater contrast and a wider colour spectrum. Some of the biggest names in the video industry including Samsung, LG and Sony have split-off to form another group called the UHD Alliance, which we’ll get to in a minute.

But talk to the engineers steering this 4K broadcast bandwagon and they’ll tell you everything spec-wise is up for grabs. If this indicates to you that the 4K standard is anything but set in stone, you’d be correct.

Ultra HD is going to be a work in progress for years to come, but that doesn’t mean you should wait for the dust to settle before improving your image.

For more information visit http://duotechelectronics.co.uk/


Samsung Galaxy Tab Screen Replacement Guide

Samsung Galaxy Tab 2 7″ Repair Guide:

Essential Tools:

  • Safe Pry Opening Tool
  • Small Phillips Screwdriver
  • Small Flathead Screwdriver
  • Adhesive Strips
  • Heat Gun/Hair Dryer
  • Prior to starting your repair you must completely power down your device.
  • Next it is required that you remove your microSD card from the device.
  • Using a safe open pry tool take off the back cover by releasing the clips which hold the cover in place.

[IMG]

After removing the back cover use the pry tool to release the battery connection located at the very bottom of the tablet.

[IMG]
  • For the next step you will need to unscrew the Small Phillips screws (6) that hold in place the battery, which is shown to the left in the picture below. Doing so allows you to pry up and extract the battery
  • Once again using your Small Phillips screwdriver, unscrew the screws (12) colored in red in the figure pictured on the right below.
[IMG]
  • Then using your pry tool release the pop connectors which are outlined in the image below.
  • Cautiously release the pop connectors and make sure not to tear any of the flex cables.
  • The bottom pop connectors (2) hold in place the loud speakers. Releasing these connections will make it possible for the two loud speakers to be removed.
  • After all the pop connectors (8) are released, delicately remove the motherboard from the tablet.
[IMG]
  • (Figure 5.1) Use a Small Flathead screwdriver to take out the button flex cable located on the left side of the device, which is held in place with adhesive.
  • (Figure 5.2) Remove the device’s main camera.
  • (Figure 5.3 – 5.4) Remove the main spacers (2) on the top left and top right. The spacers are being held in place with clips, make sure to apply a tiny bit of pressure using the Flathead screwdriver and the spacers should pop out without much resistance.
  • (Figure 5.5) Remove the device’s front camera.
  • (Figure 5.6) Remove the sensor flex cables.
  • (Figure 5.7) Remove the small metal cover and the rubber grommet shielding the headphone jack.
  • (Figure 5.8) Remove the headphone jack/mic assembly.
[IMG]
  • (Figure 6.1) With a heat gun (on low) or blow dryer (on medium) heat the sides and corners of the touch screen in order to loosen up the adhesive which holds the glass screen in place. Be very cautious to not overheat the screen as it’s possible to create permanent damage your LCD screen. During the removal process you may discover that you will need to re-heat some of the stubborn spots.
  • (Figure 6.2) Next, wedge the pry tool between the seam of the touch screen and the device’s front housing. It can also be easier using a second pry tool from the inside of the device and applying enough leverage to begin the prying process.
  • (Figure 6.3) Then continue to pry along the seams of the touch screen in order to release the adhesive holding it in place.
  • (Figure 6.4) At this point the glass touch screen has nearly been completely released from all of the adhesive.
  • (Figure 6.5) Eventually it should be possible to fold over the touch screen on the side of the housing where the connection is being fed through the unit’s housing. Now you should be able to totally remove the touch screen.
  • (Figure 6.6) If the LCD screen is also in need of replacement simply push on the back of the LCD screen from within inner housing in order to remove it.

[IMG]

To fix a new touch screen you will need to clean off the dirty and old adhesive and replace with fresh adhesive strips to the device’s inner housing. This simple step will allow you to properly replace a glass digitizer.

Samsung Tab Battery Replacement Guide

A battery, after a certain period of time, will begin to lose its life span after a charging period. This guide highlights how to remove the back cover of the tablet in order to get to the battery as a means to replace it.

Step 1

Step 1 Battery 

  • Make sure the device is turned off before attempting to disassemble it.

  • At the top portion of the memory card slot, use the small metal spudger to create separation between the back cover and the rest of the device.

  • The small metal spudger is only used to create separation between the back cover and the rest of the device, not to remove the back cover.

  • If possible, try to use a normal nylon spudger to separate the back cover, as it is much softer and less likely to mar/scratch the device.

Step 2

  • Use the intermediate metal spudger in place of the small metal spudger to remove the back cover. This is done by sliding the intermediate metal spudger around the perimeter of the device, beginning at the top portion of the memory card slot.

  • The second picture shows the internal portion of the device once the back cover is removed.

Step 3

Step 3

  • Disconnect the electrical connector from the motherboard using the bent precision tweezers.

  • Avoid touching the motherboard with the tweezers. Metal tools such as the tweezers can scratch the motherboard and potentially cause damage.

Step 4

  • Use the flat end of the plastic spudger to pry the battery apart from the rest of the device.

  • An alternative method is to loosen the battery using the plastic spudger, and then to remove the battery by pulling on the paper tab that says “Pull (Hands Only).”

  • Once the back cover and battery are removed, the device should look like as illustrated in the second picture.

For more information or if the problem consists with your device visit http://duotechelectronics.co.uk/

Electrical Safety at Work

Figures quote that there are about 1000 accidents each year at work which involve electric shock or burns. Of these 1000, 30 of them are fatal.

However, the non-fatal accidents should not be underestimated and even these can cause severe and permanent injury to people.

The possible problems that could occur to cause injury or death from electricity include the following:

  • Contact with live parts
  • Faults
  • Fire or explosionRisk assessments should be the first step in controlling potential electrical accidents and these can:
  • The risk of any of these happening is greatly reduced when risk assessments are carried out and measures are put in place to control the possibility of these incidents occurring.
  • Identify any hazard
  • Determine who is at greatest risk
  • Evaluate these risks
  • Evaluate existing precautions and suggest more if requiredFollowing a risk assessment, the findings can identify any possible areas which need to be addressed to reduce the risk of electrical accidents. Possible areas for improvement may include things like:
  • Certain workplaces and circumstances will automatically increase the danger of electrical accidents and potential problems. These could include places which are wet, places which are enclosed and small, or which deal with hazardous conditions and equipment.
  • Electrical system upgrades and replacements
  • Ensuring that maintenance of electrical systems and appliances takes place
  • Preventing socket overloading
  • Ensuring all appliances are safe for useAlongside carrying out risk assessments and improving areas following this, regular maintenance and precautions should be a matter of standard when dealing with electrical systems and equipment.
  • Source: http://www.duotech electronics.co.uk
  • This is only a sample of the many ways improvements could be made. However, each environment should be taken on an individual basis and improvements made to suit that particular workplace.

Do Christmas Lights Need to Be PAT Tested?

Is your office lacking the festive sparkle that comes from Christmas lights because you’re scared they’re not totally safe? We’ve got good news…(and yes we realise it is way too early to mention that dreaded word!)

Christmas lights are one of those objects we all wheel out that time of year. By the time the festive season arrives, they’ve probably been living in a cupboard for the past eleven months, or lounging in a loft somewhere, gradually tangling themselves together into totally unreasonable knots.

Once you’ve got them out though (and forced an employee to untangle them, potentially leading to things being thrown – dodge that pot plant!), a lot of firms either don’t put their lights up at all, or end up spending money getting their lights PAT tested every year to make sure they’re safe.

Now we’ve said it before and we’ll say it again – PAT testing is NOT a legal requirement every year. It is only a legal requirement annually in high-risk environments where equipment may be subjected to extreme stress. Examples of this include construction sites, but it’s pretty unlikely you’ll be putting up your Christmas lights in one of those.

With this new information in mind, we can tell you right now that Christmas lights don’t have to be PAT tested. Instead, it is more than acceptable to conduct a simple visual check on all of the cables and lights. If any are damaged, wiring is frayed or other factors are in play, you should replace your lights.

In other words, use your common sense, and if something looks dangerous, don’t use it!

Now go and check over your lights and get them up. Christmas demands it.


Source: www.duotechelectronics.co.uk

PAT Testing for Mobile Businesses

PAT Testing isn’t just for businesses and large companies.


Portable Appliance Testing isn’t just for businesses and large companies; in addition it is a fundamental requirement of most insurance policies where the public could be put at risk.  So whether you are a mobile hairdresser, gardener, locksmith, handyman, DJ or self-employed builder you need to comply with the regulations.

The Health & Safety Executive states that 25% of all reportable electrical accidents involve portable appliances.

PAT Testing is the common terminology.  The correct term is “inspection and testing of in-service electrical equipment” – so in fact it’s not just portable equipment any more but any electrical equipment.

The level of inspection and testing required is dependent upon the risk of the appliance becoming faulty, which in turn is dependent upon;

  1. The type of appliance,
  2. The nature of its use
  3. The environment in which it is used.

For example a mobile hairdresser could use many electrical items hairdryers, curling tongs, hair straighteners and shavers to name but a few and it would be advisable for them to check what their insurance requirements are for PAT testing.

Incidentally mobile hairdressers are not classed as ‘low risk’ like an office, they are high risk as their equipment has the potential to become dangerous as it can easily get wet and easily get damaged.

All electrical items have the ability to short fuse, overheat and in the worst case scenario, spark or cause a fire.  The last thing any independent hairdresser or indeed any other trader who offers services in people’s homes wants is to go to a client’s home and find themselves in a situation where they could potentially be causing harm; not just to a person, but also their home.

Ensuring each item is regularly PAT tested and keeping a log of this makes for good business practice.  The benefits far outweigh the cost.

To learn the Health and Safety precautions on PAT Testing, visit the official HSE website:

http://www.hse.gov.uk/electricity/faq-portable-appliance-testing.htm

For more information visit http://duotechelectronics.co.uk/

Covert Cameras in the Care Sector

Examples of covert cameras in care

In recent years, there have been an increasing number of cases in which secret filming has been used to expose the abuse of vulnerable patients in care homes. In one high profile case in October 2012, six care home staff members were jailed and five were given suspended sentences after several incidents of shocking treatment of disabled patients at Winterbourne View care home were secretly filmed.

The footage, recorded by BBC reporter Joe Casey, who posed as a care worker, was broadcast on television in a Panorama programme in 2011. It showed both physical and psychological abuse suffered by patients at the hospital, some of who had conditions such as autism and learning disabilities.

In other cases widely reported by the media, incidents of abuse were filmed by secret cameras placed by family members.

In one such example, a camera was set up at the Granary care home at Wraxall in 2012, by the son of Gladys Wright, a patient who suffered Alzheimer’s disease. The footage showed staff swearing at and shoving the 79 year-old, with the result that three workers pleaded guilty to ill treatment and were banned for life from working with vulnerable adults. One of the three workers admitted stealing the dementia patient’s food and was jailed for four months, the second was given a suspended jail sentence and the third a community order to do 180 hours of unpaid work.

Subsequently, in March 2015, Shaw Healthcare, which runs the Granary, reportedly told the BBC that it had instructed staff to confiscate any hidden cameras they may find in future, citing “legal issues around filming people without their consent and the ability of those who may not have the mental capacity to give proper permission”.

For more information on covert cameras and how they can be used to provide evidence in a serious situation such as the above, please visit http://duotechelectronics.co.uk/